
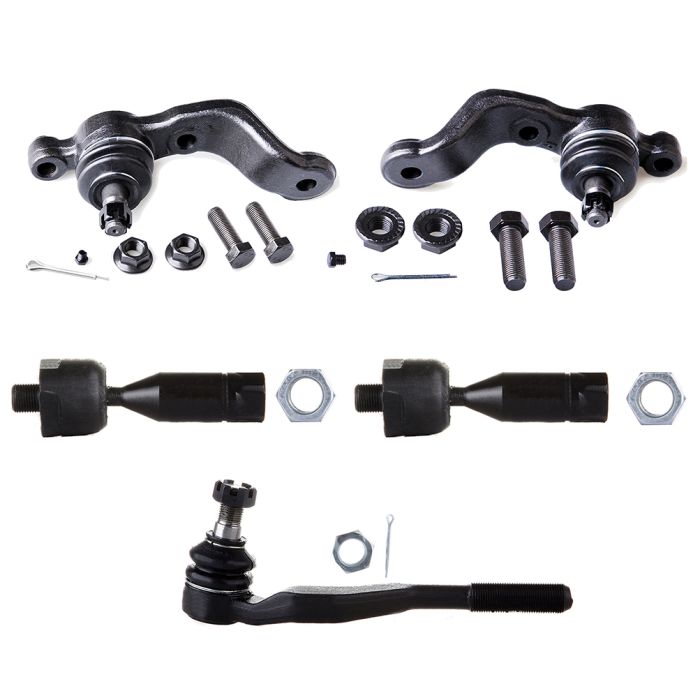
5pc Front Lower Ball Joints Tie Rods Kit For 1998-2004 Toyota Tacoma 4WD RWD
- 1996-2004 Toyota Tacoma , etc.
- With OEM Standard
- Fully Assembled
- In-Situ Installation
- Eliminate Abnormal Noise
- All End Links Are Pre-Added Grease
Wholesale Deals: Enjoy 5%-20% Off! Tap to Unlock
| Buy 3 | Buy 10 | Buy 30 | Buy 50 | Buy 100 |
| $51.87 /ea | $51.31 /ea | $50.19 /ea | $49.08 /ea | $47.96 /ea |
2020 Buick Encore Essence 4Cyl 1.4L
Change VehicleThis product is universal
Retail Flash Sale: Buy More, Save More!
- Over $129, $5 OFF, Code: SAVE5
- Over $249, $15 OFF, Code: SAVE15
- Over $399, $30 OFF, Code: SAVE30
- Over $999, $80 OFF, Code: SAVE80
Product Specifics
- Brand: ECCPP
- Manufacturer Part Number: E80483401CP
- Interchange Part Number: K90260 K90261 ES3545 EV433
- OE/OEM Part Number: 454639295 45533975 433339355, 433339565, K9686
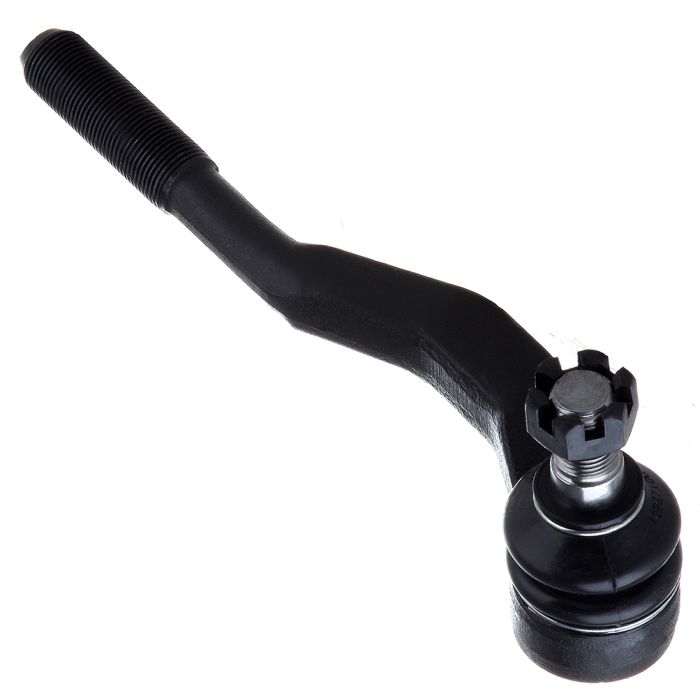
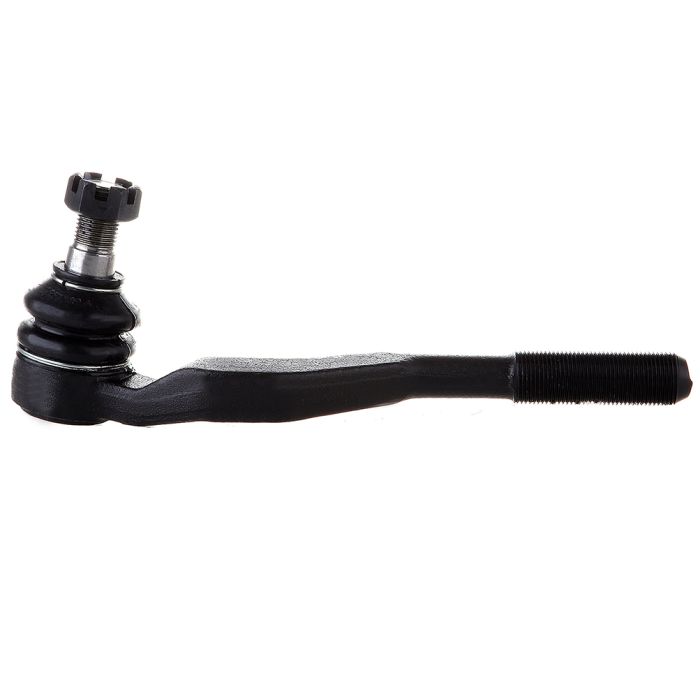
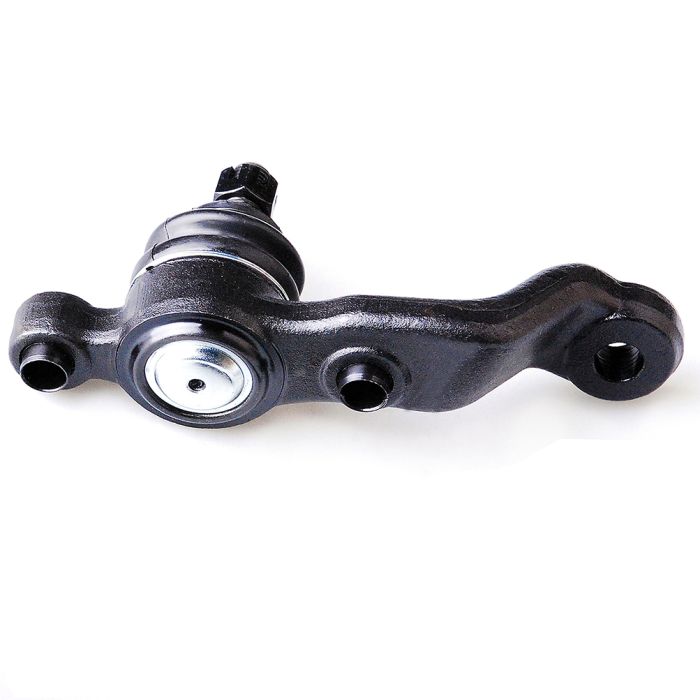
- Kit Parts Included: Tie Rod End,Ball Joint
- Items Included: Mounting Hardware
- Cross Part Number: 433439275, 433439445, K9688
- Kit or Single Part: Kit
- Placement on Vehicle: Front,Left,Right,Lower,Inner,Outer
- Manufacturer Warranty: 10 Year
- Surface Finish: Premium Quality
- Greasable or Sealed: Greasable
- Country/Region of Manufacture: China
- Bundle Listing: Yes
- Adjustable: Yes
- Universal Fitment: No
- Package Included: 5 Pieces
- OE Spec or Performance: OE Spec
- UPC: Does not apply
- UPC: Does not apply
- Type: Tie Rod Linkage
- Features: Greasable
- Finish: Coated
- Material: Alloy Steel
- Mounting Style: Bolt-On
- Cotter Pin Hole: Yes
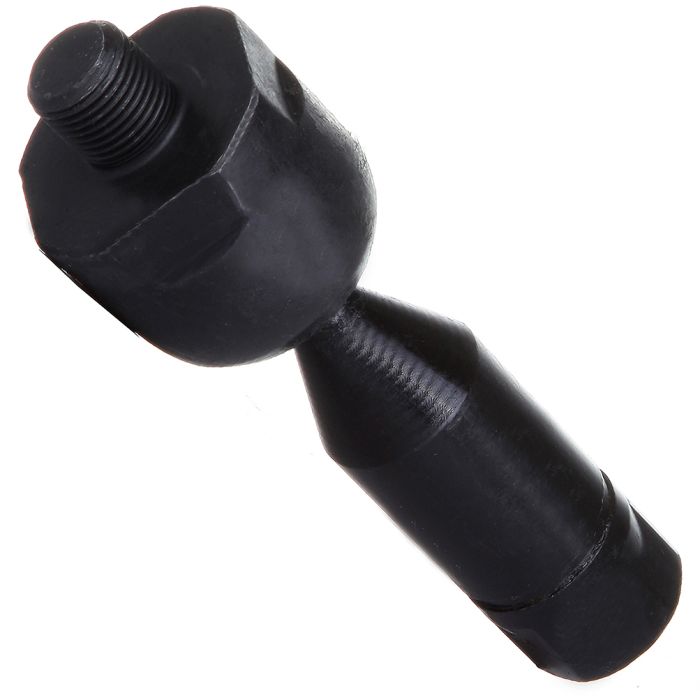
Ball Joint Replacement Guideline
If there is a knocking or clunking noise in the area of the front axle when the car is traveling over road bumps, potholes or curbs, then there is usually a defect in a component of the wheel suspension.
Picture(A)
The side of the front axle from which the (vibration) noise is emanating can already be determined during a test drive. The type of noise also already provides certain indications for maintenance regarding which components might be faulty.
Picture(B)
1.Raise the vehicle and remove the front wheels.
2.To loosen the fastening screws and fixing nuts of the compression ball joint more easily, spray them with rust remover and allow to act for a few minutes.
Picture(C)
3.Loosen the fastening screws of the broken ball joint on the control arm and remove the nuts.
Picture(D)
4.Loosen and remove the fixing nut of the ball joint on the steering knuckle.
Tip:If the ball stud rotates, hold the ball stud in place with a hexagon socket.
Picture(E)
5.Remove the bad or worn ball joint from the control arm.
6.Loosen the compression ball joint on the steering knuckle using a suitable special tool.
Picture(F)
7.Clean the cone connection.
Tip:For better sealing and durability of the ball joint sleeve, a little silicone grease can be applied to the contact surface.
Picture(G)
8.Insert new compression ball joint in the control arm and steering knuckle and tighten with new fixing nuts.
9.Reinstall front wheels. Lower the vehicle and tighten the wheel studs to the tightening torque specified by the vehicle manufacturer.
10.Measure the chassis and adjust it using the various holes on the compression ball joint if necessary.
11.Finally, carry out a test drive.
Tie-Rod End Replacement Guideline
If you feel a bump in the steering when driving over road bumps or curbs, this might be due to worn tie rod ends or inner tie rods. Clicking noises during sudden steering movements can also be symptoms of a defective tie rod. In order to determine the exact cause and replace the defective tie rod, the car must be elevated with a vehicle lift in order to be examined more closely.
This useful tip applies to the exchange of tie rod ends and inner tie rods, which together form the so-called tie rod.
Picture(A)
While driving, the following signs may indicate a faulty sway bar stabilizer link
(1).Rattling and thumping noises on rough roads.
(2).Imprecise vehicle handling.
(3).Stronger inclination of the vehicle during cornering.
If the sway bar stabilizer link is found to be defective, it should be replaced as described below.
Picture(A)
1.Raise vehicle and remove front wheels.
Tip:Always check both stabilizer links and replace them in pairs if necessary.
2.Spray fastening nuts of the stabilizer link with rust remover and let act for a few minutes.
Picture(B)
3.Loosen the lower fastening nut of the stabilizer link at the stabilizer and remove.
Tip:If the ball stud also starts to turn, hold it with a suitable tool.
4.Press stabilizer link out of torsion bar.
Picture(C)
5.Loosen the upper fastening nut of the stabilizer link at the suspension strut and remove it.
Tip:If the ball stud also starts to turn, hold it with a suitable tool.
Picture(D)
6.Press stabilizer link at suspension strut out of bracket.
Picture(E)
7.Insert new stabilizer link at suspension strut.
Picture(F)
8.Tighten stabilizer link at suspension strut to the tightening torque specified by the vehicle manufacturer.
Tip:Secure the ball stud against twisting with a suitable tool.
Picture(G)
9.Insert new stabilizer link at stabilizer.
10.Tighten stabilizer link at stabilizer to the tightening torque specified by the vehicle manufacturer.
Tip:Secure the ball stud against twisting with a suitable tool.
Picture(H)
11.Remount the front wheels. Lower the vehicle and tighten the wheel studs to the tightening torque specified by the vehicle manufacturer.
Tip:Even if replacing the stabilizer link does not directly affect the chassis setting, we recommend checking the axle setting and adjusting if necessary after working on the suspension.
12.Conclude with a test drive.
Note
Cleanliness is extremely important when working on the power steering. Incorrect work and contamination can lead to leakage and, in the worst case, to failure of the steering assistance.
1.Lift the vehicle and dismount the front axle wheels.
2.Spray the fastening nut of the tie rod end with rust remover and leave it on for a few minutes.
Picture(B)
3.Dismount the front underride guard.
Picture(C)
4.Loosen the fastening nut from the tie rod and remove it completely.
5.Remove the tie rod end from the steering knuckle using an appropriate ball joint separator.
Picture(D)
6.Remove the clamp of the bellow on the steering gear.
7.Push the bellow towards the tie rod end.
Picture(E)
8.Unscrew the inner tie rod from the rack.
9.Clean the sealing face of the bellow at the steering gear.
Picture(F)
10.Clean the lug of the rubber contact surface of the ball joint in the steering knuckle.
Always use new self-locking nuts and bolts for a reliable repair.
11.Screw the new inner tie rod into the rack and tighten it with the tightening torque that has been specified by the vehicle manufacturer.
Picture(G)
12.Mount the bellow and close the clamps with the appropriate special tool.
Incorrect mounting of the bellow can lead to corrosion of the rack: the steering gear starts leaking which can lead to a failure in the steering assistance.
Picture(H)
13.Secure the ball joint in the steering knuckle and mount the nut. Please observe the tightening torque suggested by the vehicle manufacturer.
During mounting, the ball stud should not turn within the ball joint. This can cause damage inside the ball joint and can lead to early failure.
Tip:Secure the ball stud against twisting with a suitable tool.
Picture(I)
14.Mount the front underride guard.
15.Mount the front wheels and tighten them with the tightening torque recommended by the vehicle manufacturer.
16.Align the wheels and adjust them if necessary. Observe the vehicle manufacturer specifications.
17.Perform a test drive.
When performing the test drive, pay special attention to the handling while cornering and listen for possible noise emission.
Part Fits For
| VEHICLE NAME | YEAR | ENGINE |
|---|---|---|
| Toyota Tacoma | 1995~2004 | 2.4L|2.7L|3.4L |
Frequently Asked Questions and Answers
Shipping Policy
Please confirm the shipping address and billing address. The shipping address should be a physical address, we DO NOT ship to the P.O. box address.
Handling Time
Once the order was placed please allow us 1-2 business days for packing and shipping, checking the order information is a very important step to build a better shopping experience.
Special Case: For the transaction paid by using a PayPal eCheck, the payment will be completed within 3-6 business days. The handing and shipping should be started up as soon as the payment is successful.
Shipping Time
The order will be shipped on the same day or the next business day, especially for the order on Friday or weekend, it would be shipped on the next business day.
ECCPP website orders were being supported by USPS, UPS, and FedEx.
International Shipping/ Postage
We could only offer an International shipping service for Canada. After checking your location, we will send the actual shipping fee to your email for confirmation.
Split Shipments
If your order contains multiple parts, you may receive more than 1 package for the following reasons: (1)The parts ordered are currently in different warehouses. (2) The parts won’t all fit in a single package. It may cause different delivery times. Please wait patiently and don't worry, thank you.
More details please check out shipping policy.
Warranty Policy
We offer a 1-year warranty for our products, if you get any warranty-related trouble with our products, you could contact ECCPP directly for professional and quick support, we'll help you solve the issue 100% sure! We also take care of all quality-related issues with a replacement including any return shipping costs. For the products purchased from one of our retailers, we do not provide support related to after-sales. Please contact the retailer directly for specific guidance on their warranty process.
Exchange & Return Policy
When you purchase products from ECCPP official site, you agree to our policy about returns, exchanges, and refunds as outlined. More details please check out exchange and return policy.